Pages

Thursday, April 18, 2013

The Half Bath from Hell!

In my very first blog post, I explained the terrible experience I had with buying my home. If you haven't, please read it and learn from it.  For instance, even three months after closing on the home, I got a letter from the title company asking me to sign a paper they "forgot" to have me sign.   The experience was so bad that when we finally closed, I refused to go in the house for a whole week. The only reason I entered my new house after the week was because my mother was in town and wanted to see. Every time we went to the house, I acted like a total brat. HATED the HOUSE! After moving in and settling a bit, I begin liking it. As we move forward with renovations, I think I like the house even more, and then I get a setback like this half bathroom from hell.

We began renovating our half bathroom. While most people would tolerate the way it looked, I hated it and had to change the whole thing.  There was an old toilet and the vanity was built into an odd wall that had a weird-concave like angle. It had to go. I didn't anticipate everything to go smoothly, but i expected things to not be like this and in all fairness, after the wall incident, they are all pretty much my own fault.


Let me preface this my saying, the times it takes to do this is because we work opposite shifts. Most of the things we do require two people. I work in the day, he works at night. The only time I see him with his eyes open are on weekends.

I also know a lot of these issues we are having is due to the fact that we are doing everything ourselves and we haven't been the best in planning these little catastrophes. Shit happens. It's just in my nature to think everything going wrong is the end of the world. I have a naturally pessimistic attitude. 

BATHROOM FROM HELL INCIDENT 1:

As I may have mentioned before, I curse whoever painted this house. They painted flat paint over gloss which translates into a mess when you try to clean the walls.  Well in the bathroom, it translated into paint peeling off the wall.  I suggested spackling it and then sanding and painting over it. My fiance bought an orbital sander instead and went to town on the walls  

This may not seem like a big deal, and it probably wasn't. but it took close to 3 weeks to rectify this situation. As a perfectionist, I am still not pleased with the imperfections in the wall. The image below is how it turned out when we initially painted the walls.


BATHROOM FROM HELL INCIDENT 2:

The sink we bought is from ikea.  It was inexpensive and a great buy for a wall-mounted sink. Wall studs typically sit 16" apart.  In my house, one of the studs were 10" and 14" apart with NO stud where the sink needed to be mounted at. 

When we found this out, I threw a tantrum (very child like).  Eventually my fiance came up with a solution that would take an additional month to rectify.  
 He had to cut open the wall and install 2x4 studs horizontally  between the oddly placed studs. Once he did this, he placed the wall back in place, spackled, sanded and painted it.

The issues here came when the 2x4s were not cut short enough, we had to turn the water off more than once and the pipes wouldn't stop pouring water. It was a lot of poor planning on our part, but knowing nothing about what he was doing, I didn't know how to plan for the negative things that could go wrong. 

We eventually got the sink in and it looks beautiful and ended up being worth the trouble. I will show you pictures when the whole bathroom is complete.  :)

BATHROOM FROM HELL INCIDENT 3:

The current issue is actually my own fault. I wanted a river pebble/stone flooring. You can buy river stone tiles, but they cost at least $10/sq ft.  Even though this bathroom is small, it is still about 20 square feet, translating into over $200. I didn't want to pay that much for it.  My bright idea was to buy 40lb bags of river stone and some thin set and slap it down on the floor.  I did this on one section of the floor to see if this would work, and it did! 
In between me creating the picture above and now, incident #2 took place and I had to stop. I needed there to be a solution for the sink first because if we were unable to get the sink mounted to the wall, I would have to go with a pedestal or another vanity, and it would have NEVER sat level on this stone. It would probably always have a teeter to it.  So, I stopped doing this and waited until we got the sink it.  

Once we got the sink in, I took to doing this again and found that I needed more stone. That shouldn't have been an issue, but Home Depot had discontinued the stone I used for this.  I used the nifty store inventory locator, and grew increasingly disappointed. :(

There were two shops that sold white river stone, but it wasn't right. They weren't smooth like the ones I already had were.  

I am immensely disappointed and don't know what to do for the floor at this point.

Any ideas?

Long Awaited Kitchen Update

As I may have said before, my kitchen is about 80 percent complete. The floor and cabinets are done. We only need to do the countertops and paint the the walls.

I had previously said, I would just paint the countertops, but when we took them out, a weak spot broke. We currently have the old countertops with the broken space covered with a garbage bag because I am unsure of exactly what kind of countertops I want.

I wanted to include more details and pictures before I started with my bathroom progress.

After we took everything out of the kitchen, we laid vinyl plank flooring. We used vinyl plank, because I initially wanted to use laminate but learned that this wasn't the best idea for a place that could get wet regularly.

I used TrafficMaster Allure Resilient Vinyl Flooring.  Overall, it was easy to use. I'm not a directions reader so it took awhile for me to get the hang of it. Once I read the directions, it turned into a very easy job. I would suggest buying a vinyl tile cutter  to go along with it. It will make your life easier!
 
It all kind of snaps together with an adhesive that is already present on the tiles. If you make a mistake, you just carefully remove the tile and try again. Very easy!!! My kitchen is very small (about 7x9) and I used 2 boxes of this vinyl plank.
Do you like it? It have been about 4 months since I have installed it and it holds up beautifully. I have no issues or complaints with this.


As I said before, some of my cabinets had to be replaced. I ended up replacing four cabinets and keeping the rest. The new cabinets were unfinished, so I sanded and  primed them with 2 coats of a basic white primer. I decided to use Rustoleum Cabinet Tranformations to change their look. 

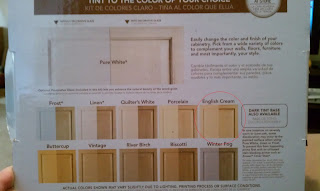
I have heard mixed reviews about this product. It seemed simple enough. I went to my local Home Depot to pick up the small kit. If you use cabinet transformations, keep in mind, that you have to get the base coat tinted to the color you want. If you just pick it up and take it home and paint, your cabinets will be white!

The very helpful gentlemen spoke with me about this kit as my paint mixed.  I mentioned I only intended on this taking a couple of days considering my kitchen is so small. He smirked and said it takes much longer. It took MUCH longer.


I chose English Cream since my kitchen is very small and I wanted to open it up as much as possible without going with white and still having a distinct color.

The transformations kit comes in four steps. The first step is the deglosser. MAKE SURE YOU ABSOLUTELY USE THIS! I actually missed the side of one of the higher cabinets because it wasn't deglossed, the paint turned out like this:
yucky, right?!

After the deglosser, you wait about an hour and then when your cabinets are dry, you move on to step 2. You paint the bond coat on the cabinets. The cabinets that were primed only needed two coats of the bond coat. The cabinets that were old needed three due to their darker color.  This took me about 2 weekends to complete. You must wait about 2-3 hours in between each coat to repaint. This was the step that took me the longest. I thought I would be on step two forever!

Finally after everything was painted and complete, I moved on to step 3 which is an optional step if you want the glaze on the cabinets. I did. This was relatively easy. You just paint the whole cabinet with the glaze and then wipe with the provided lint free cloths until you get your desired look. Because I am a perfectionist, this took me longer than I would like to admit.

The last step is the top coat. This goes on quickly and dries in about an hour.  I gave it 24 hours and then started putting everything back together, including some new brown knobs and drawer pulls that go great with it.

A before and after shot:
 The final product. It looks great! the pictures really don't do them justice.

Overall, I am happy that this turned out so great. It was easy, yet time-consuming, but I would do it again. What do you think? That was as far as I could go with the kitchen. I am still not 100% sure what I want to do for countertops or paint colors. Any ideas for me?